In this knowledgebase article we will assist you with adding and configuring a new email account in your Apple Mail on macOS 10 or earlier versions.
1. Click Mail on the menu bar.
2. Select Add Account.
3. Select the radio button next to Add Other Mail Account and click continue.
4. You will now be asked to fill in your email credentials:
Full Name: The name displayed to the email recipient.
Email Address: The full email address of the account you wish to connect to.
Password: The password used for this email account.
5. Click Next.
6. You will now be asked to enter your incoming mail server details:
Account Type: Select POP or IMAP. You may choose to set up as IMAP or POP. We recommend using IMAP. (Click here for the difference between IMAP and POP).
Mail server: Please use mail.yourdomain.com.au (replacing yourdomain.com.au with your actual registered domain name)
User Name: The full email address of the account you wish to connect to.
Password: The password used for this email account.
7. Click Next.
8. You may get another warning message about Apple Mail not being able to verify the identity of the server you are attempting to connect to.
Simply click Connect to continue.
9. You will now be asked to provide additional information about the incoming mail server:
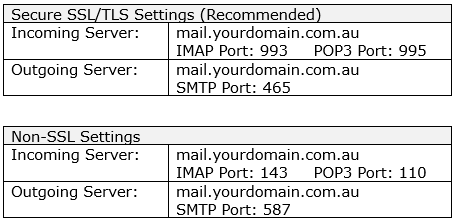
Port: Your incoming mail server port number, please refer to the above chart for the port settings.
We recommend to select the box to Use SSL, using Secure SSL/TLS Settings for your choice of IMAP or POP3.
Authentication: The password used for this email account.
10. Click Next, you will be then asked to enter in your outgoing mail server details, click Create and enter the additional information when required.
SMTP server: Please use mail.yourdomain.com.au (replacing yourdomain.com.au with your actual registered domain name)
User Name: The full email address of the account you wish to connect to.
Password: The password used for this email account.
13. Click on Mail and then select Preferences.
14. Select Accounts and then click on the account you created, then click Advanced up the top.
Make sure “Allow Insecure Authentication” is selected and Port is 993 for IMAP, or Port is 995 for POP3 with Use SSL checkbox ticked. Refer to the above chart for more details on the settings required.
15. Click on Account Information tab up the top.
16. Click on the Outgoing Mail Server(SMTP) dropdown server list and select Edit SMTP Server List.
17. Click on the SMTP server you are using for this account.
18. In the Server Name type your server full hostname mail.yourdomain.com.au (replacing yourdomain.com.au with your actual registered domain name)
19. Click on the Advanced tab and make sure the Server port is 465 and USE SSL is ticked.
20. Uncheck ‘Automatically detect and maintain account settings’.
21. Enter your username using your full email address, and your password.
22. Click OK and close the accounts window.
If you’re still receiving error messages, please read step 2 in the following article.
2 Possible Fixes for Mail SMTP Sending Errors in Mac OS X
Related articles:
