
The sender block list allows you to block emails from a specific email address or domain. This can be useful when you need to prevent spam coming from a specific email address or domain.
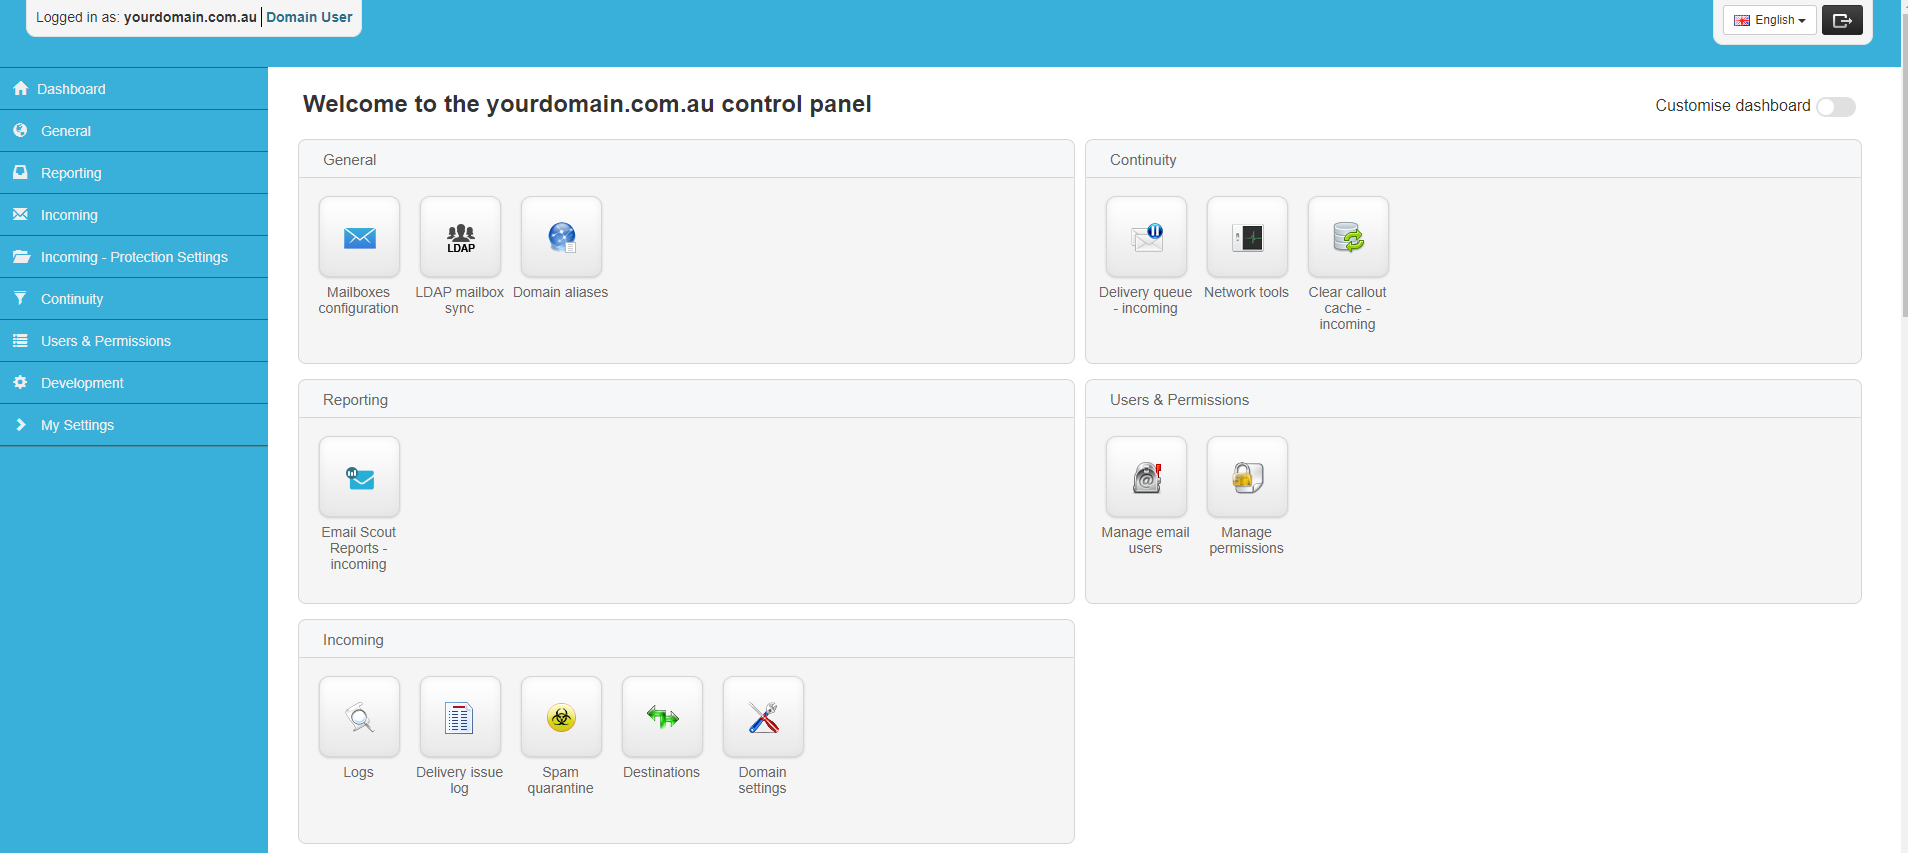
Step 1: To use this feature, scroll down the SpamExperts home page until you find the section titled Incoming - Protection Settings.
Click on Sender Block List.
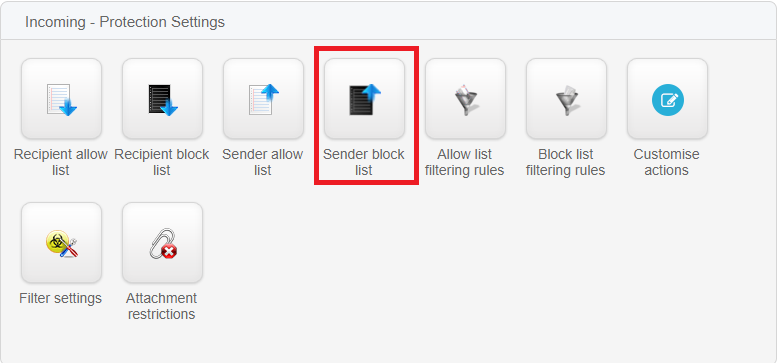
Step 2: You should now be presented with the block sender interface. There are several fields you can fill out.
- Local-part: This field refers to the portion of the email address before the @ symbol. If this is left blank, it acts like a wildcard, meaning the filter will apply to the whole domain.
- Address: This field refers to the domain, or the portion of the email address after the @ symbol.
- Sender Flag: This field refers to which part of the email headers will be used to identify the sender. In most cases this should be left as both.
In the example below, we are blocking admin@somedomain.com.
If instead we wanted to block all email addresses using @somedomain.com, we would leave the Local-part field blank.
Step 3: Once you have filled out the required details, click Save.
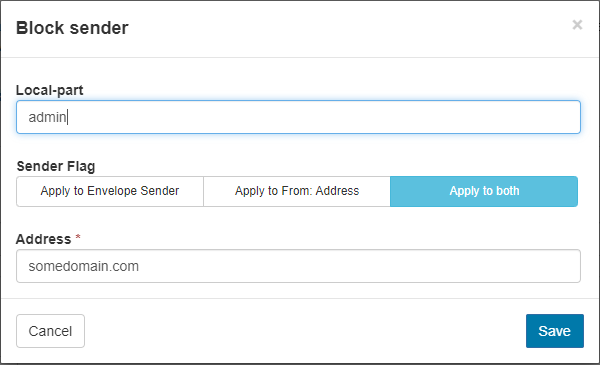
Step 4: After you have saved your sender block rule, you should be returned to the previous screen. Note that any rules you have added will now be listed at the bottom of the page.
From this page you can manage your existing rules.
Tick the box next to a rule, and several additional options will appear.
- Edit: This will allow you to edit the selected rules.
- Copy Sender: This will copy the local part and address fields into a new rule.
- Remove: This will remove the selected rules.
- Export as .CSV: This will export the selected rules as a .csv file, which can then be imported into other programs.
The Recipient Block List functions in a similar way to the Sender Block List but instead blocks emails that are destined for a specified email address within your domain.
This function isn't used often, but can be useful in the event that you want to have an internal email address that can only be emailed by others within your domain, and will reject any email sent from outside the domain.
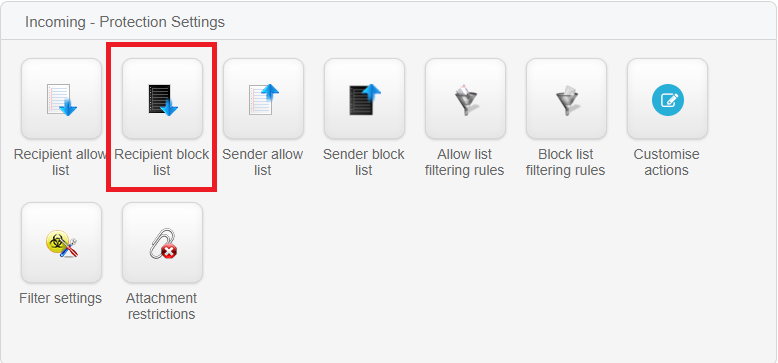
Step 1: To enable this feature, scroll down the SpamExperts home page until you find the section titled Incoming - Protection Settings.
Click on Recipient Block List.
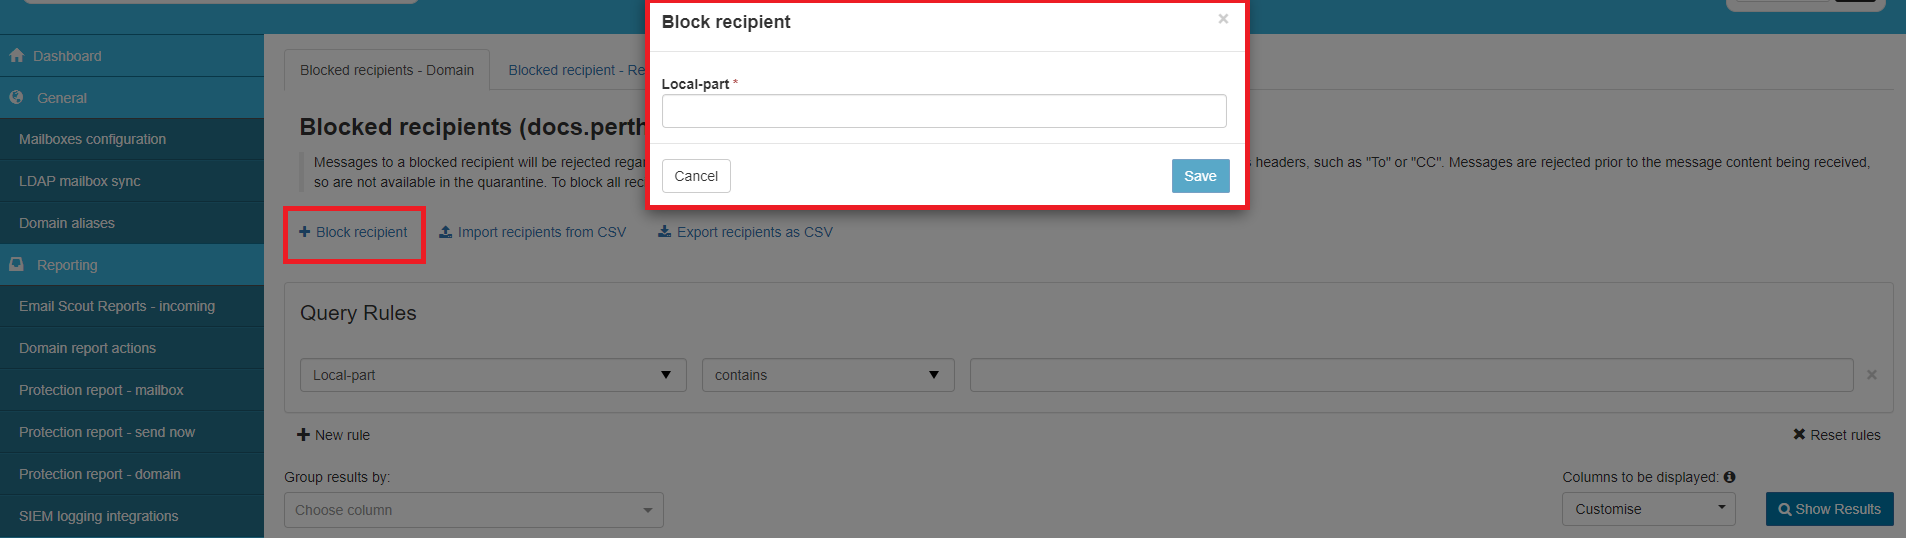
Step 2: You should now be presented with a screen similar to the example below.
Click on +Block Recipient and the block recipient interface should appear.
Step 3: This interface only has one text field to fill out, which is the Local-part.
Please enter the recipients username into the Local-part text box, which is the portion of the address before the @ symbol. SpamExperts will automatically associate the username with your domain.
Step 4: Once you have entered the Local-part, click Save.
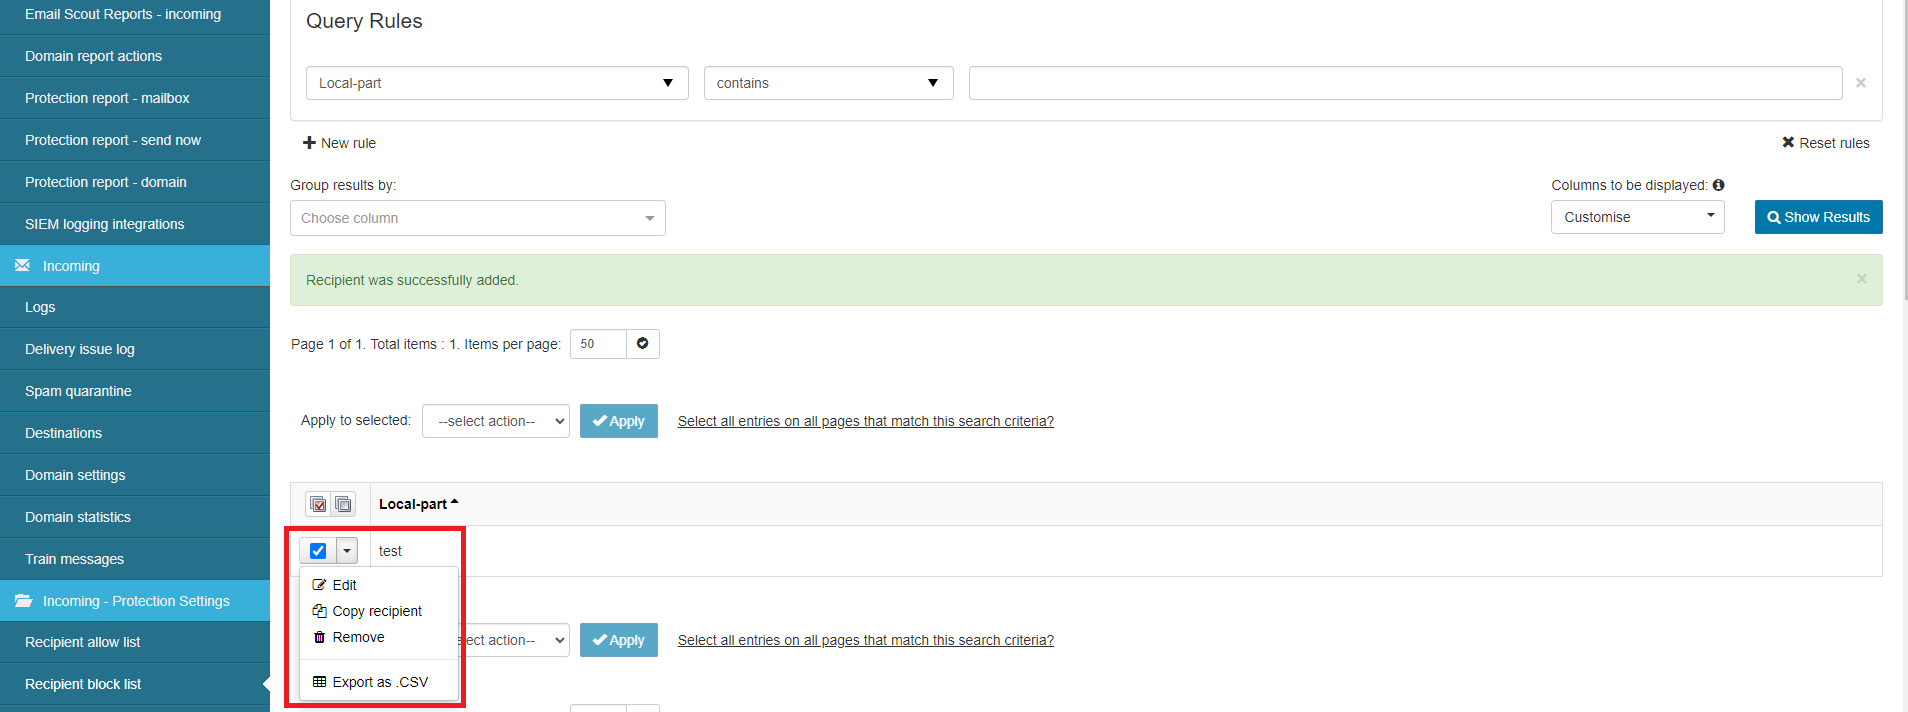
Step 5: After you have saved your recipient block rule, you should be returned to the previous screen. Note that any rules you have added will now be listed at the bottom of the page.
From this page you can manage your existing rules.
Tick the box next to a rule, and several additional options will appear.
- Edit: This will allow you to edit the selected rules.
- Copy Recipient: This will copy the local-part field into a new rule.
- Remove: This will remove the selected rules.
- Export as .CSV: This will export the selected rules as a .csv file, which can then be imported into other programs.
One of the features of SpamExperts is the ability to generate reports at regular intervals about spam that has been blocked or quarantined by SpamExperts.
On the SpamExperts home page, Select one of the following options from the left hand menu.
Protection Report - Domain
Protection Report - Mailbox
Protection Report - Send Now
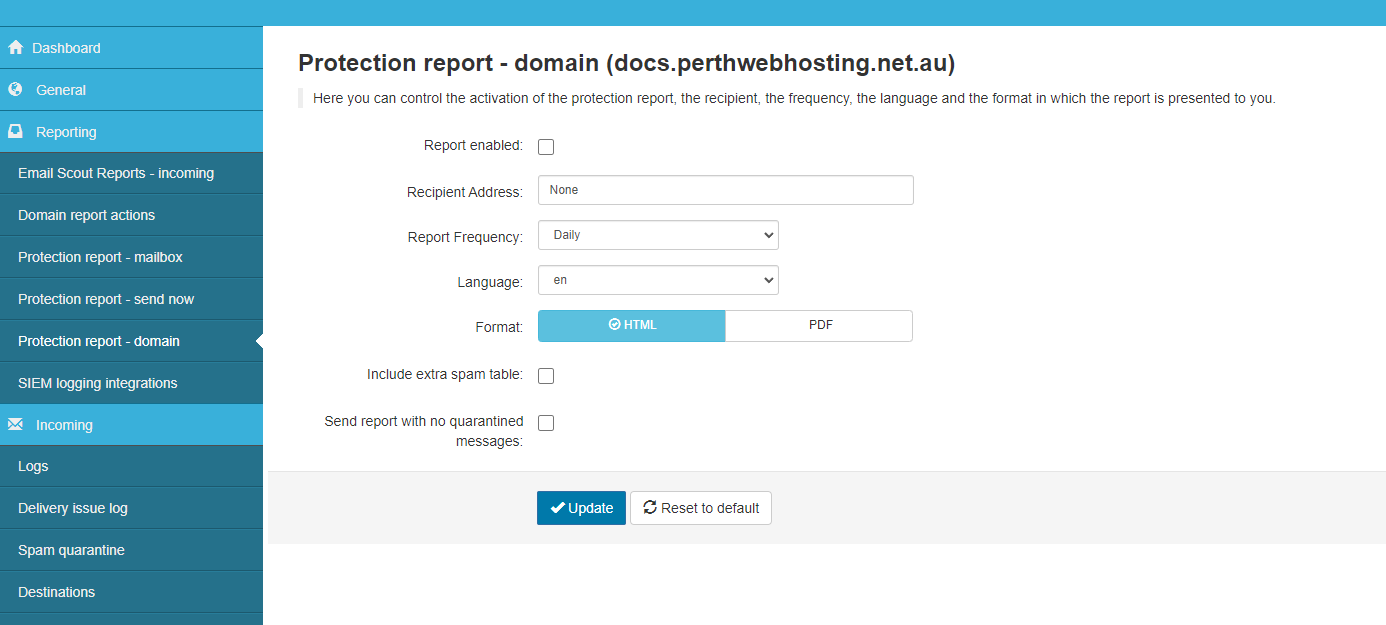
Protection Report - Domain
The Protection Report - Domain will produce a report about any quarantined spam emails that have been sent to your domain.
There are several fields for you to fill out.
Report Enabled: While this is selected the report will run.
Recipient Address: This is the email address that the report will be sent to.
Report Frequency: How often the report will run. This can be daily or weekly.
Language: The language that the report will be written in.
Format: The format that the report will be published in. This can be HTML or as a PDF file.
Include extra spam table: If selected the report will add an extra column to display spam that was blocked, instead of quarantined.
Send report with no quarantined messages: If selected the report will be sent even if it doesnt include any messages.
Once you have filled out the required fields, click Update.
Protection Report - Mailbox
The Protection Report - Mailbox will produce a report about any quarantined spam emails that have been sent to a specific mailbox.
On the Protection Report - Mailbox interface, click on Add a recipient.
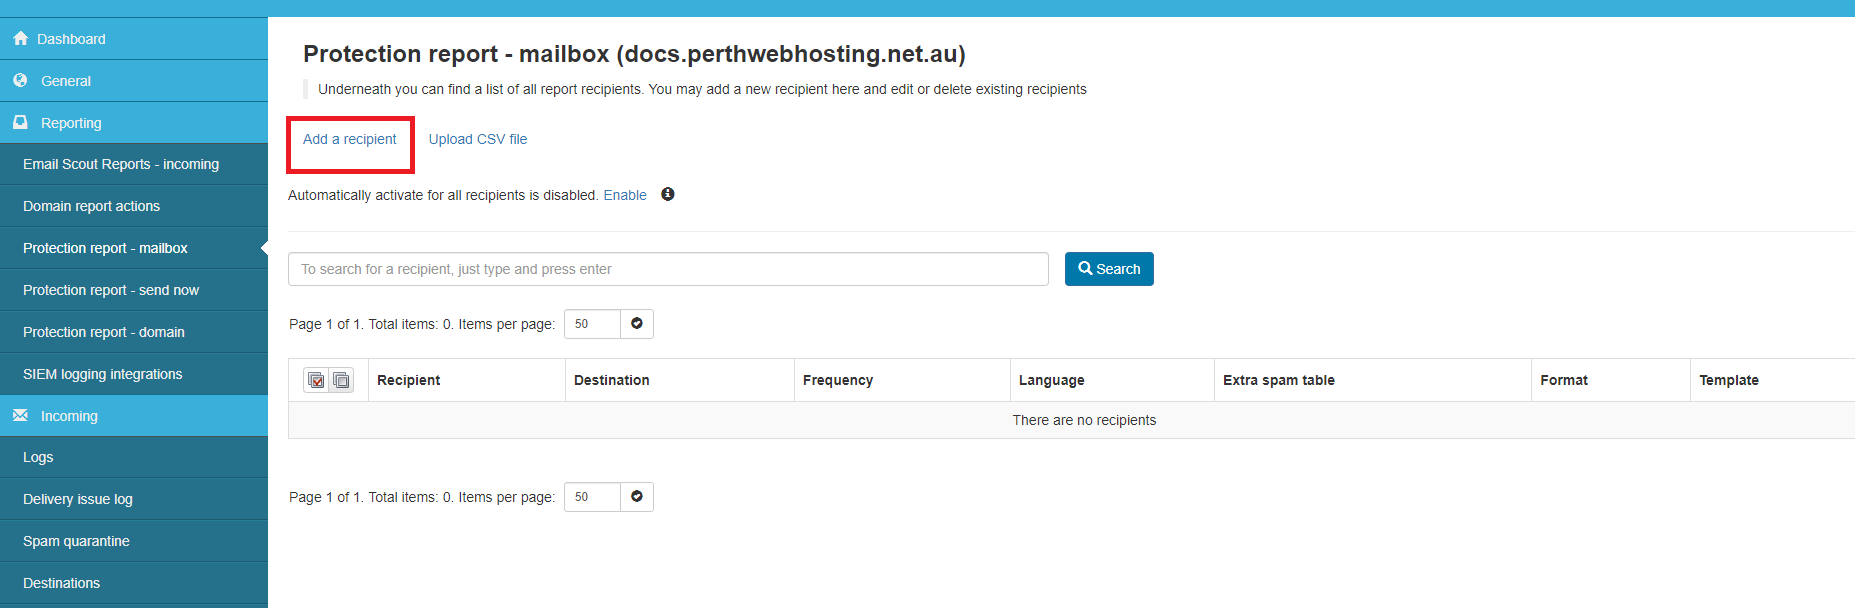
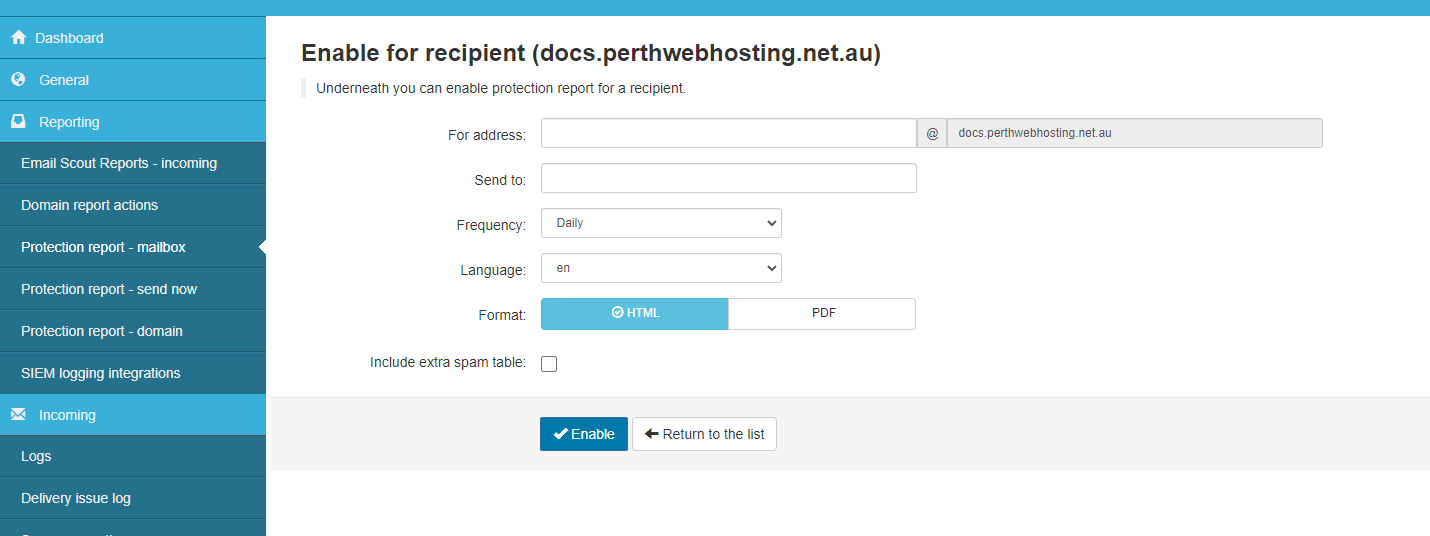
You should now be presented with a screen similar to the example below. There are several text fields for you to fill out.
For Address: Enter the username of the email address you want to generate a report for.
Send To: The email address you want the report to be sent to.
Frequency: How often you want to run the report. You can select daily or weekly.
Language: The language you want the report to be written in
Format: The format of the report. You can select html or a PDF file.
Include Extra Spam Table: If selected the report will add an extra column to display spam that was blocked, instead of quarantined.
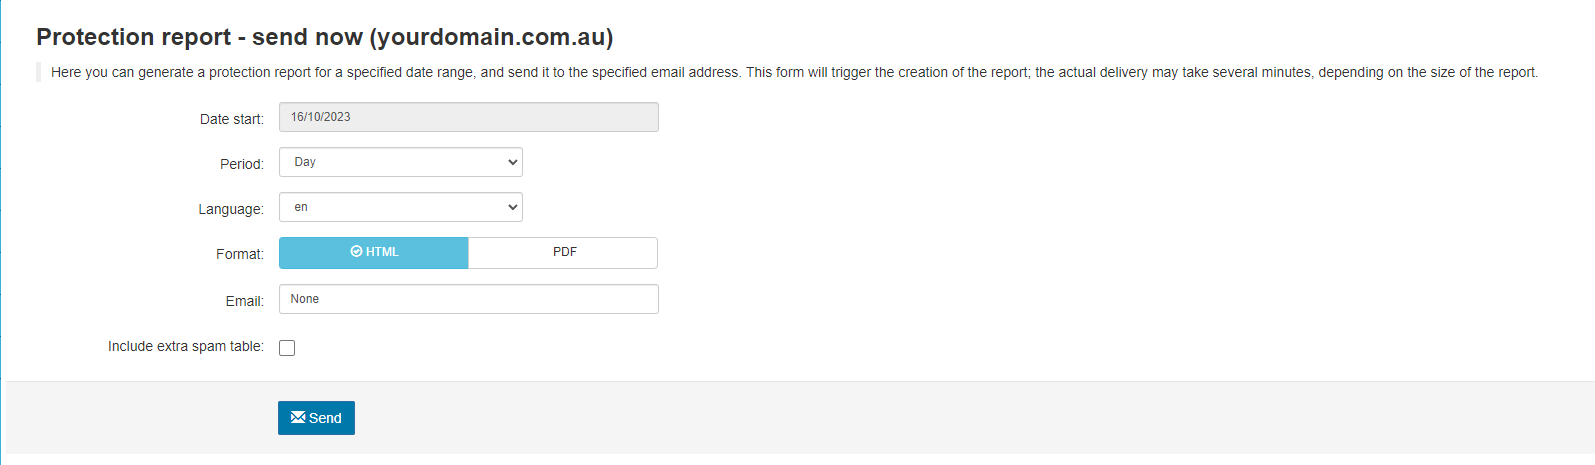
Protection Report - Send Now
The Protection Report - Send Now will produce an on demand report about any quarantined spam emails that have been sent to your domain.
There are several fields for you to fill out.
Date Start: The date from which the report will begin.
Period: The period that the report should cover. You can select Day or Week
Language: The language that the report will be written in.
Format: The format that the report will be published in. This can be HTML or as a PDF file.
Email: The email address that the report will be sent to.
Include Extra Spam Table: If selected the report will add an extra column to display spam that was blocked, instead of quarantined.
Once you have filled out the required fields, click Send.
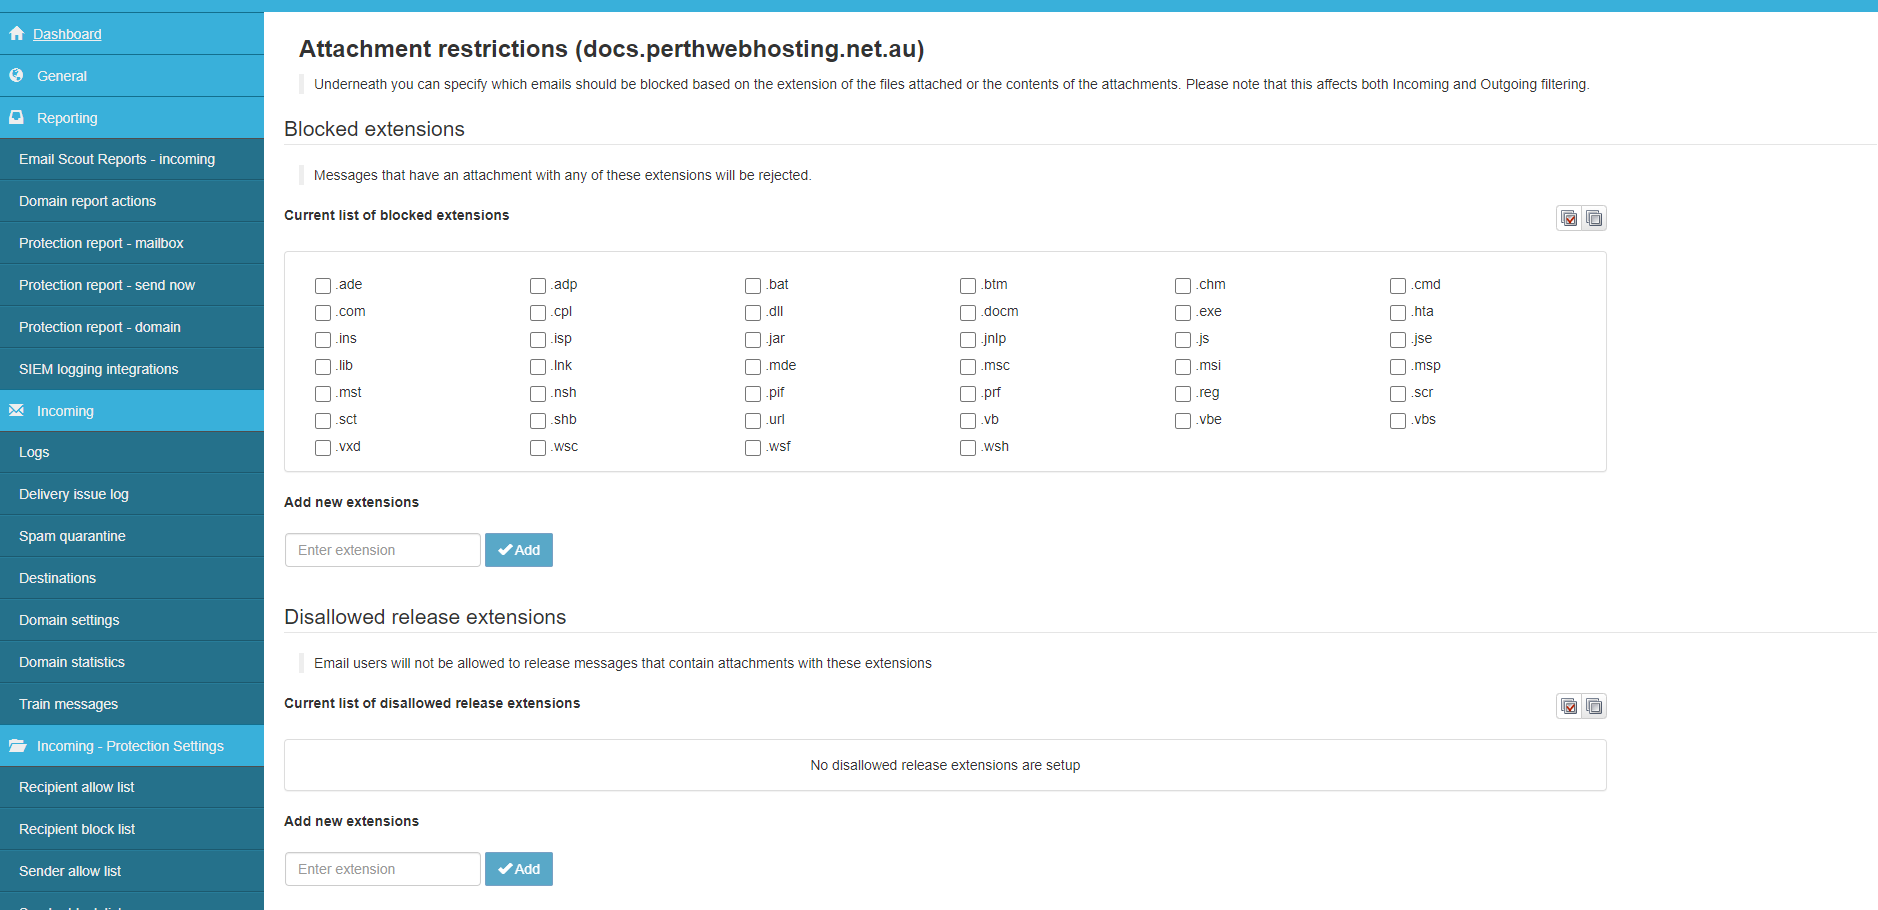
Attachment Restrictions will block certain file extensions such as .exe or .jar that are sent via email. This tool will also scan for and block zip files that either contain a restricted file type, or that are password protected and therefore not able to be scanned by this tool.
To use this tool, click on Attachment Restrictions in the Incoming Protection Settings section.

You should now be presented with a page similar to the example below.
Blocked Extensions: The extensions listed here are all blocked.
You can add extensions to this list by entering them into the Add New Extensions field, and then clicking Add.
You can remove an extension from this list by selecting the box next to it, and clicking Remove Selected.
Disallowed Release Extensions: Email users are unable to release any emails, that contain any file extension listed here.
You can add extensions to this list by entering them into the Add New Extensions field, and then clicking Add.
You can remove an extension from this list by selecting the box next to it, and clicking Remove Selected.
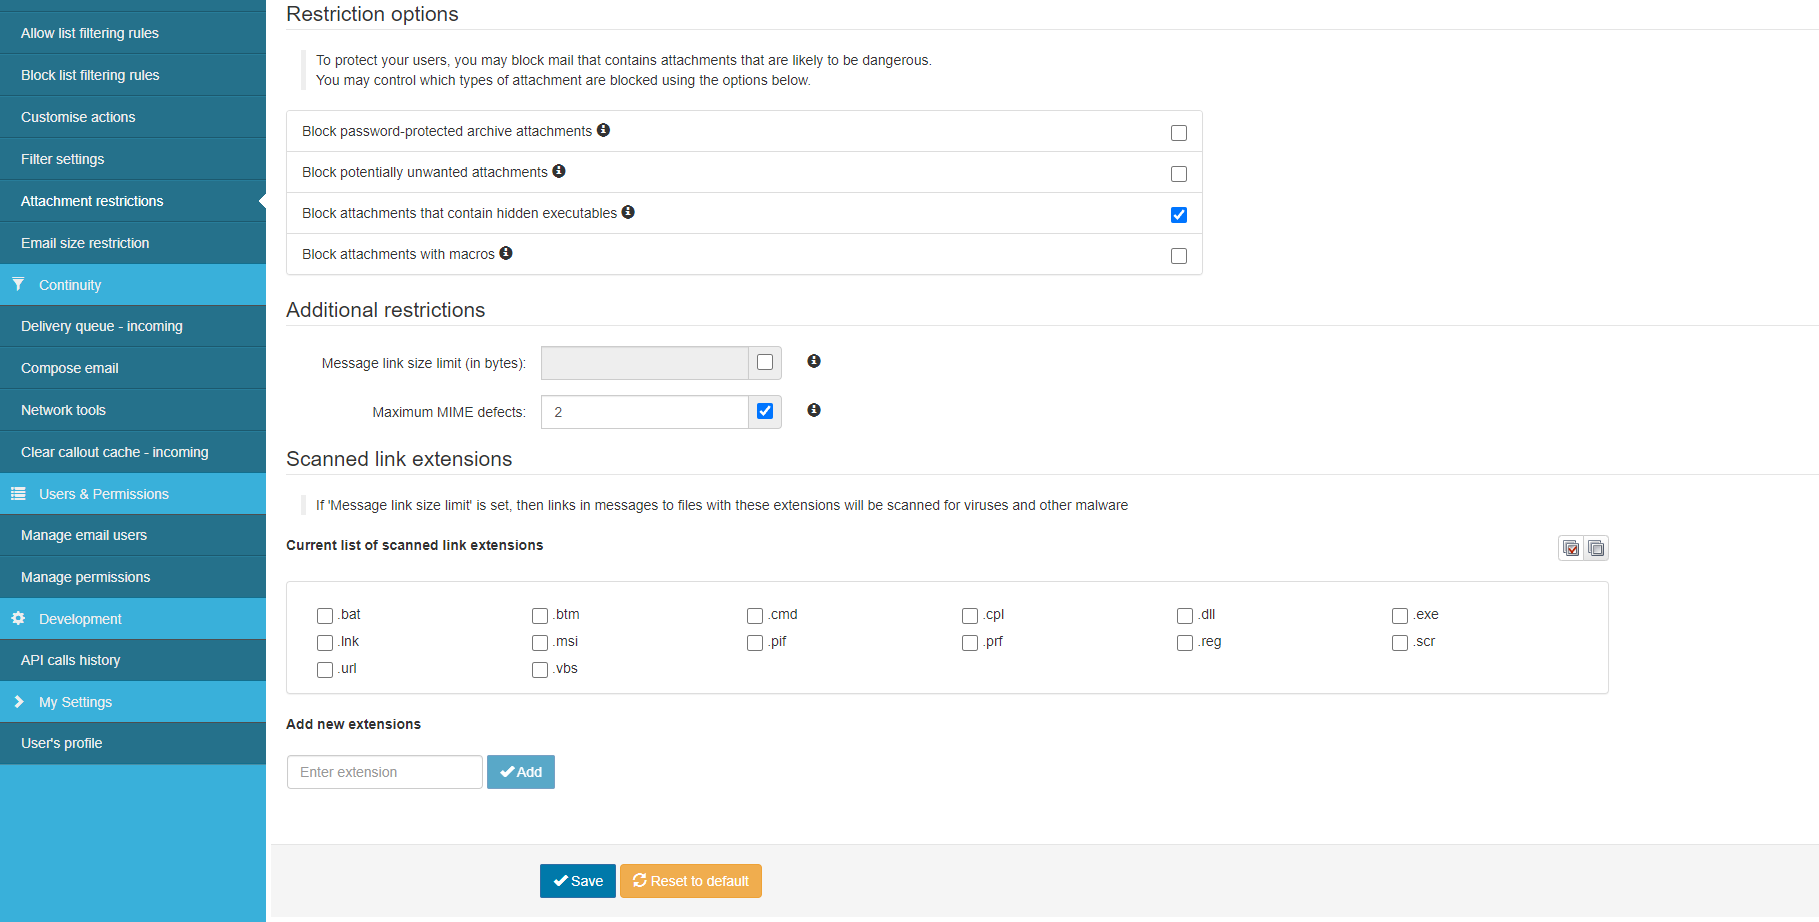
Restriction Options: This section allows you to set up additional types of restriction.
Block emails that contain password protected archives.
Block potentially unwanted, but not explicitly blocked extensions.
Block attachments that contain hidden executables.
Block attachments that contain macros.
Additional Restrictions:
Maximum MIME Records: Any emails with more defects than the limit will be restricted