1. To install OneDrive , go to office.com in a browser and sign in using your Microsoft account details.
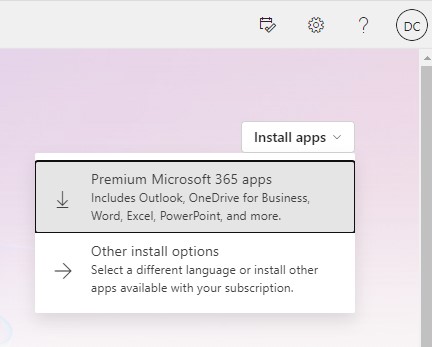
2. Once signed in click on the button that says "Install Apps" and then select "Premium Microsoft 365 Apps"
3. An installation file should download. Run this to install the Microsoft 365 application bundle.
1. Once you have installed OneDrive, you will need to sign in using your Microsoft account credentials.
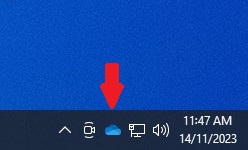
2. Click on the OneDrive icon which should appear in your windows task bar. If this does not appear, open your start menu and search for OneDrive , and left click on it to open the application. Note that the OneDrive icon will be grey if you are not yet signed in.
3. For the sake of future convenience, you can add OneDrive to your task bar by right clicking on the OneDrive application , selecting more, and then selecting pin to taskbar.
4. Once you are at the login screen for OneDrive , you will need to enter the credentials for your Microsoft 365 business account.
You may be prompted to set up multi-factor authentication.
For help with setting up multi-factor authentication, please refer to our guide: Guide to set up Multi-Factor Authentication (MFA)
Important: If you have a Personal OneDrive account, please ensure you keep it separate to your Business OneDrive account. Mixing these up may result in you inadvertently sharing your personal documents with your business, or vice versa.
The blue icon represents your Business OneDrive account while the white icon represents your Personal OneDrive account.
![]()
The best method for controlling access to a folder or file, is through the Manage Access Interface. The benefit of managing access in this way is that you have greater control over who can access items.
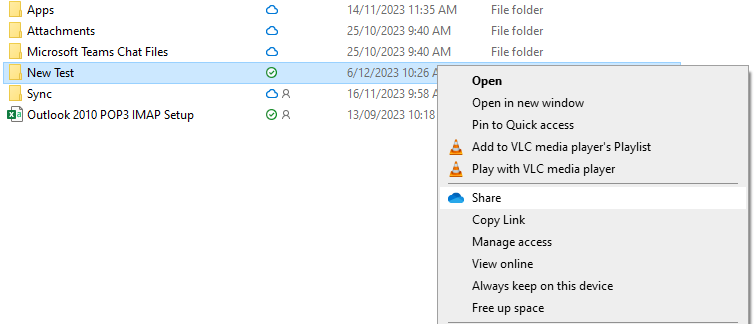
1. Right click on an item and select Manage Access.
2. From this interface you have several options for managing the access and sharing of a file/folder.
- Share: Clicking this will allow you to share this file/folder with additional users.
- Stop Sharing: Clicking this will cease all sharing of this file/folder and only the owner will have access.
- Can Edit/Can View: Clicking this will allow you to change the type of access a person or group has to a file/folder.
- People: This tab will list all people who have been granted access to this file/folder
- Groups: This tab will list all groups who have been granted access to this file/folder
- Links: This tab will allow you to modify or revoke the links used to share this file/folder
To share an item, select Grant Access located in the top right corner
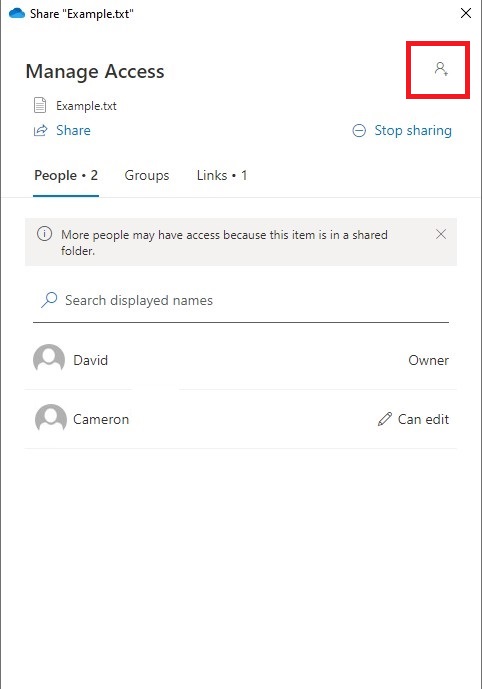
3. You should then be presented with an interface similar to the example below.
In the textbox labelled Name, Group, or Email you can enter the details of those you wish to share this item with. When you are done, click Grant Access.
We recommend that you leave the "Notify People" option enabled so that an email with a link to the shared item will be sent to your recipients.

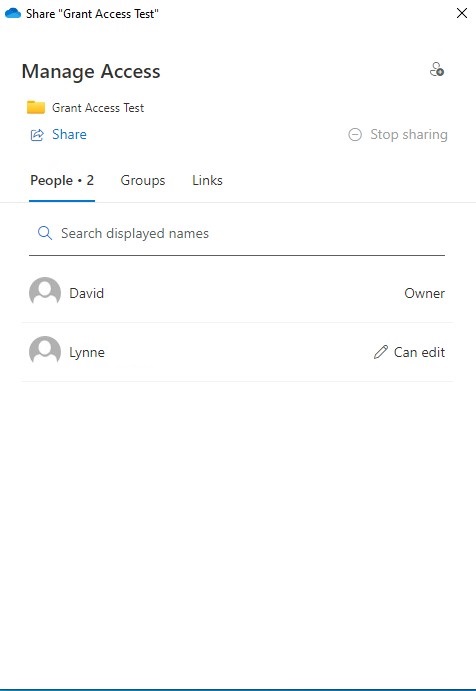
4. To revoke access to an item, right click on the folder/file and select Manage Access.
You should now be presented with an interface similar to the example below.
Next to each name or group other the owner, there is a button labelled Can Edit or Can View. Click this now.
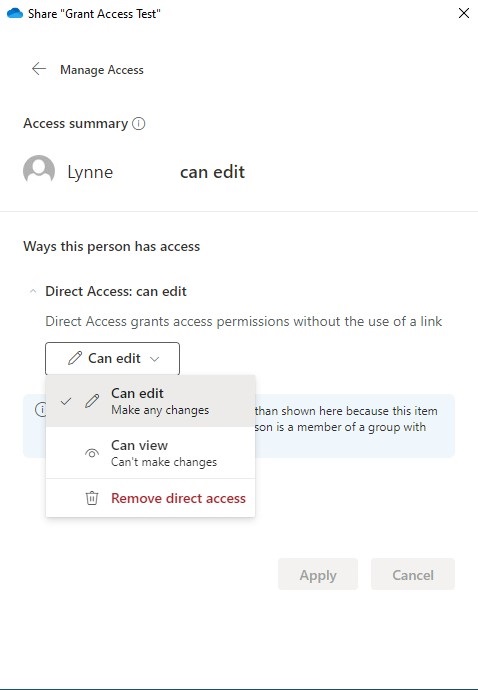
5. You should now be presented with a screen similar to the example below. Clicking the Can Edit/Can View button will open a drop down menu with several options.
Can Edit: The person/s named will be able to view and make changes to the item.
Can View: The person/s will be able to view, but not make changes to the item.
Remove Direct Access: The person/s will not be able to view or make changes to the item.
In this instance we want to revoke access, so select Remove Direct Access.
6. A message will appear asking to confirm that you wish to revoke access. Select Remove to progress, or cancel to go back.

1. The other method for sharing OneDrive items is through the share link feature.
To share an item via link, right click on an item and select Share
2. You should now be presented with an interface similar to the example below.
Select the cog symbol located in the top right hand corner to set additional options.
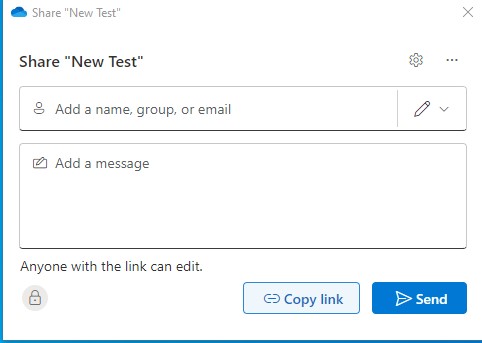
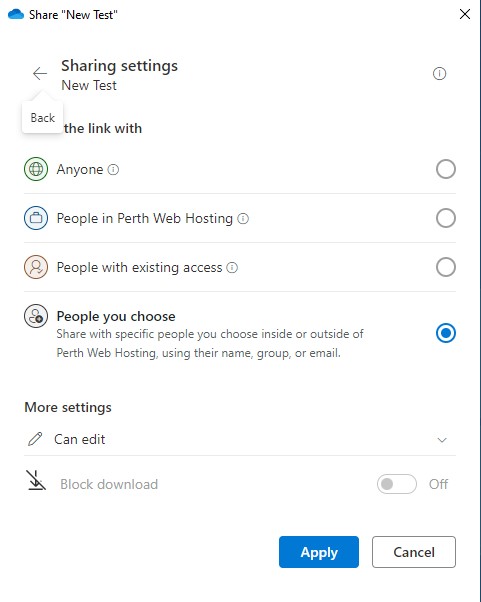
3. Under the additional options, we recommend that you select to share with People You Choose and click Apply.
This will give you greater control over the link in future.
Note: Selecting this option is especially important if you are sharing with a large number of people. If you do not select this option, then you will not be able to remove an individual from the link, without removing everyone from the link.
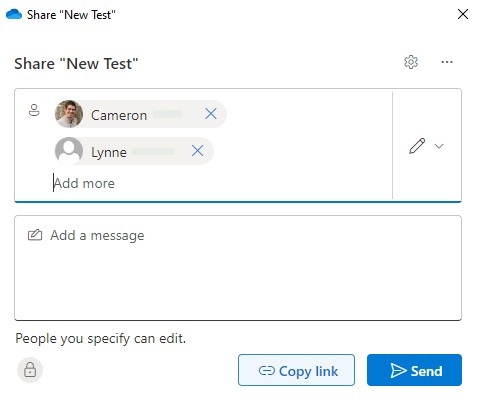
4. You should now be returned to the interface shown below.
Click on the box labelled Add a name, group, or email and then enter the details of the people you wish to share this item with.
Optionally you can add a message to be sent with the link. When you are done, click Send.
The people you have shared with will now be able to access the share items.
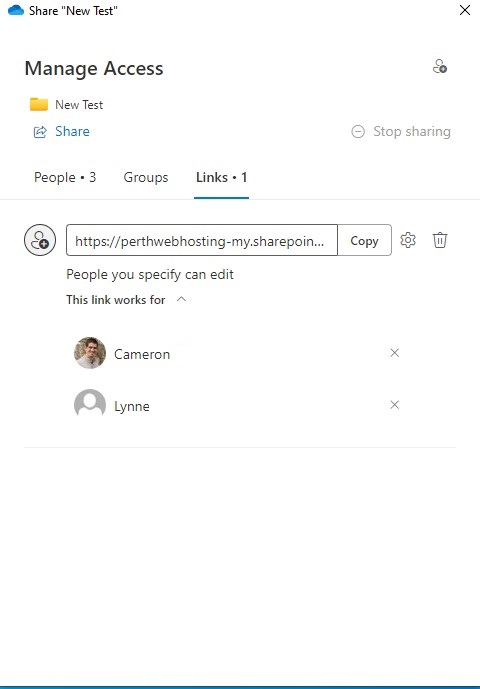
5. If you need to revoke access to an item, right click on the item and select Manage Access. You should be presented with a screen similar to the example below.
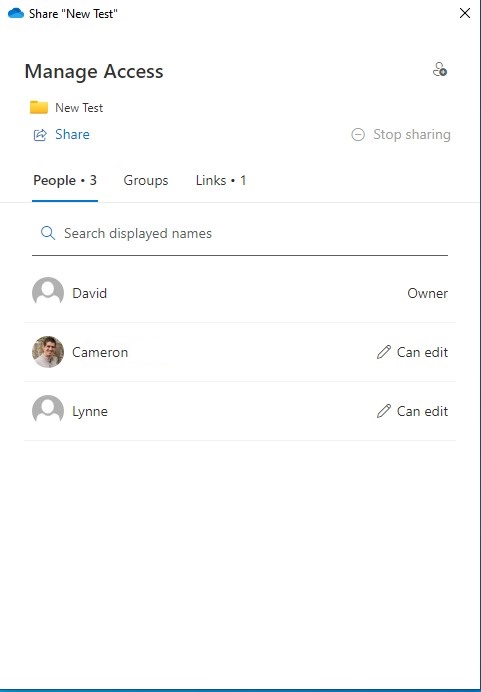
6. At the top of the interface, select the tab labelled Links.
You should now be presented with an interface similar to the example below. Select the cross marks next to a name to remove them from the link.
The people you remove will no longer be able to access the shared item.
Note: This method will only work, if you selected to share the link With People You Choose in step 3. If you did not do this, you will need to remove the entire link, and create a new one for the people you wish to re-add.
Note: Removing and then re-adding access to items will often require OneDrive to redownload any associated folders. This may potentially cause issues if you are on a metered internet connection, or have a large amount of data to redownload.
In order to force the shared items to download to your Ondrive folder, you will need to sync the folder in your online Onedrive.
In this section we will outline the three methods of accessing your online OneDrive, and how to sync the files and folders that have been shared with you.
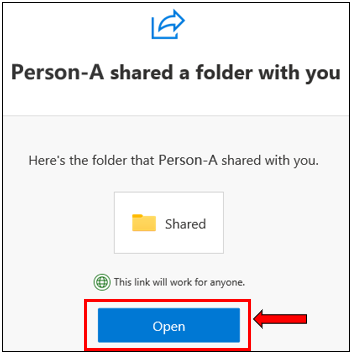
1A. Accessing your online OneDrive via an email link
Once a file or folder has been shared with someone, they will receive an email notifying them of the access, similar to the example below. Click the Open button to proceed. A browser window should open and direct you to your online OneDrive account.
1B. Accessing your online OneDrive via the desktop application
Open your OneDrive desktop application, and look for the OneDrive icon in the bottom right corner of your screen near the time and date. Click this icon, and a window similar to the example below should appear. Select View Online and a browser window should open and direct you to your online OneDrive account.
Note: OneDrive Business will be a blue icon.
If the icon is grey, you are not signed in, and will need to sign in using your login credentials.
If the icon is white, this is your Personal OneDrive account.

1C. Accessing your online OneDrive directly
Lastly, you can access your Online OneDrive directly by going to the following URL: https://onedrive.live.com/login/
2. How to access and sync shared items.
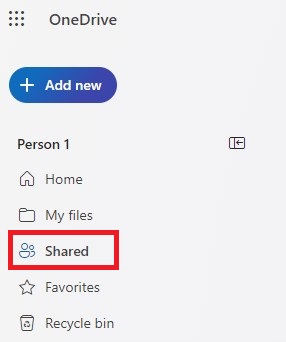
You should now have gained access to your Online OneDrive account via one of the three methods outlined above.
On the top left hand side you should see a menu with several options to filter items. To view only the items which have been shared with you, select Shared from this menu.
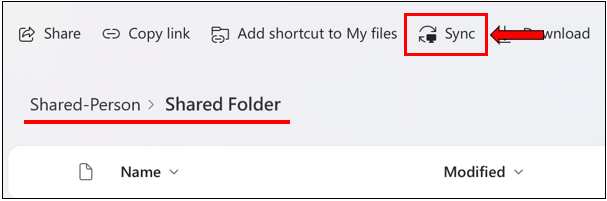
3. You should now be presented with a list of all of the items that have been shared with you.

4. Select an item, and a menu should appear above the item. Select Sync to force the item to download to your desktop OneDrive.
5. A confirmation window will appear. You can safely close this window and wait for the items to finish syncing. Note that this can take some time depending on the size of the content being downloaded, and the speed of your internet connection.

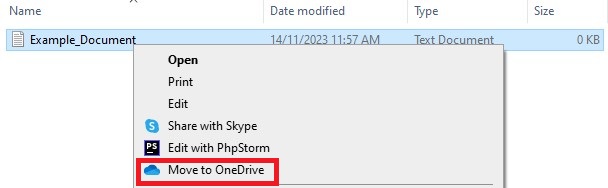
1. The easiest way to add files to OneDrive is via Windows File Explorer. Through this user interface you can drag and drop files and folders into your OneDrive folder.
Alternatively you can right click on a file or folder, and select Move to OneDrive .
2. Once you have placed files/folders into your OneDrive folder they will be synchronised with your OneDrive cloud storage.
If you make and save changes to a file stored in OneDrive , it will automatically synchronize these changes with the latest version of the file.
Note: If you are offline, or not signed into OneDrive and you make changes to a file in your OneDrive folder, the synchronisation will occur once you sign back into OneDrive .
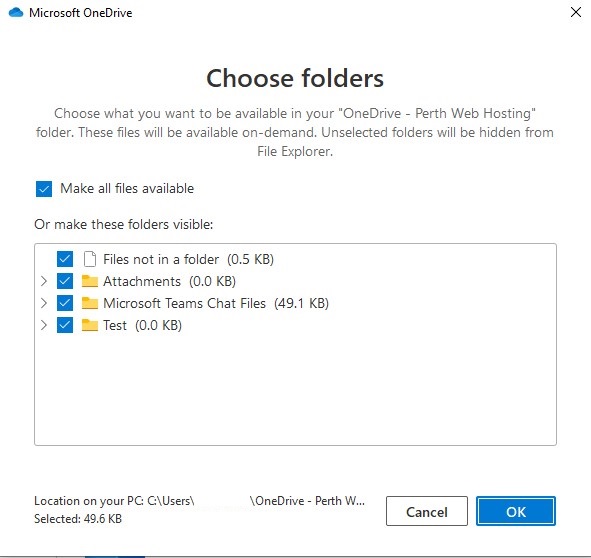
1. In some cases you may not want folders to automatically update and synchronise. If this is the case, you can exclude folders from synchronization.
2. To do this, right click in your OneDrive folder and select Settings from the dropdown menu.
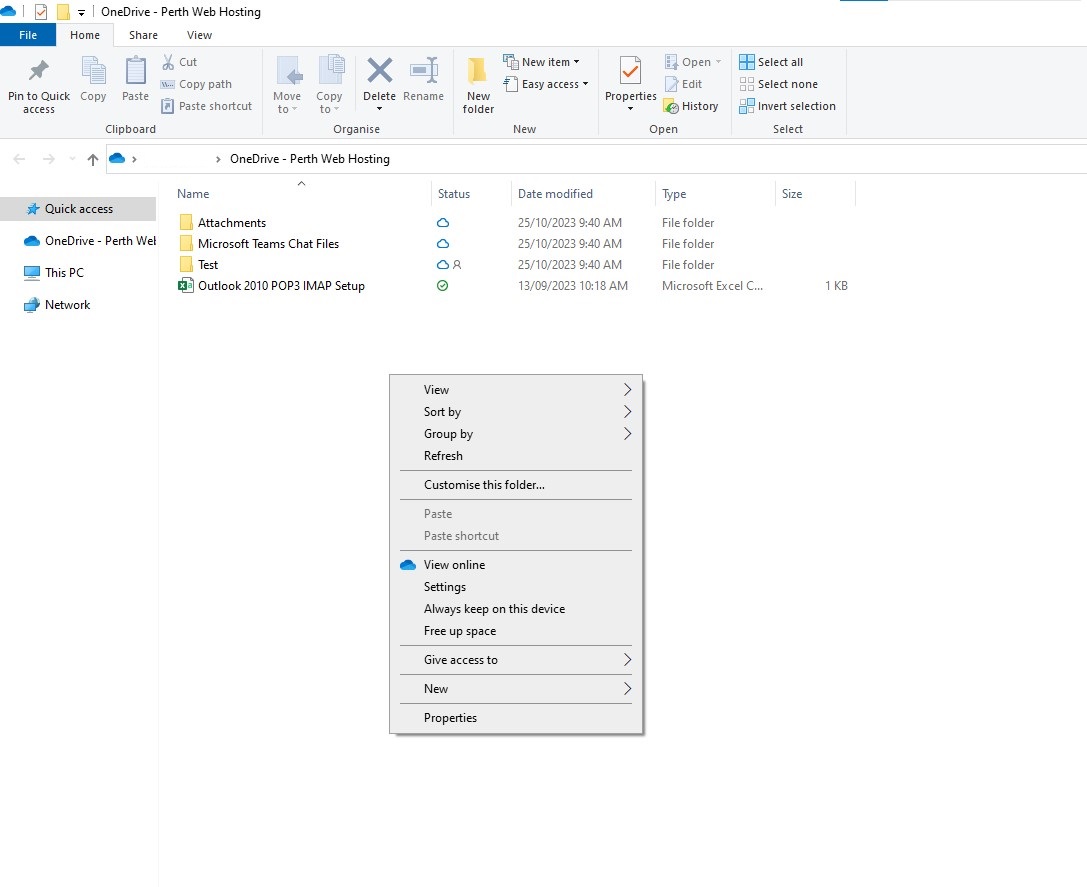
3. You should be presented with the interface shown below.
Untick the boxes next to the folders that you DO NOT want to synchronise. Click Ok